


I love this technique as it can be used to use up odds and ends from your fabric stash or equally can be used with a pre planned design and fabric purchased for the purpose . It's also great from a beginners perspective as you can use old bed sheets or t shirts or frankly any fabric strips and so you can genuinely play about without having to risk wasting any money .
So ..once you have gathered all of your equipment ..and torn some strips then you need to learn a technique to be able to attach strips of fabric to each other when you start off and as your rug grows The best video tutorials I found are made by a lovely lady over at a website called Rag Rug Cafe and these were the videos I used to teach myself . They are listed as three videos in a set order , however I found that following them in the order I have placed them in here is the most logical process. So this first video demonstrates how you attach and add on new strips of fabric .
So now you know how to tear fabric and attach strips to each other you are ready to start making your rug ! So the first steps of working your first two strips of fabric is demonstrated in this video tutorial and also in this second full video here..I suggest you watch both. These videos can also be found on the main Rag Rug Cafe Website.
I highly recommend this website as it has a forum where people share tips and pictures and is a very friendly place to post questions when starting out . The website also has a friendly Facebook group which can be found here.
I found the working the first two strips very easy when I first started making these rugs but the initial stage where you begin to work the lengths into a round very tricky and I had to replay and replay that stage of the video as for some reason I couldn't take it in !
However, with a bit of persistence I got the knack of doing it ..and once you get it it's very simple and you wonder what the problem was in the first place ! Once you start working your round you just keep on going ( adding in strips as shown in the Aunt Philly video) as you run short . Keep going until you are happy with the size of your rug and when you are ready to finish then use the technique shown here .
There is also a further video on oval versus circular rugs which can be seen here
I hope this guide helps you find all the info you need to start successfully making your own toothbrush rugs and that you have fun making them ! I will try to answer any questions you may have on the comments section .
In the meanwhile here is a rug that I made recently that shows the stages of making .
I decided I would really like to try out some bright vibrant colours for a change, as i tend to work in more muted pastels and floral fabrics..and then decided why not try a rainbow rug . So i ordered some bright colourful fabrics !

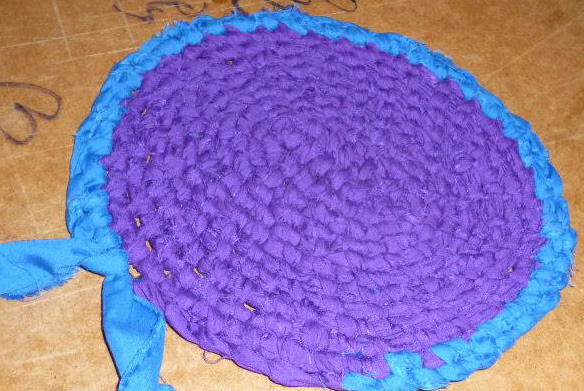
This picture shows the first two rounds colour ..as you will discover when you try out this technique it is the first couple of rounds that can be the most fiddly ! But once you get going it gets much easier !
 As you can see from this picture it's gradually getting there ! Persistence is the key and making sure you keep working on the flat . If you find the rug is bunching up or getting a "bowl " or as my other half says "sombrero effect " then make sure you are working flat, that you aren't pulling to tight on the knots as you work round and if necessary add in an occasional extra knot, especially on the corners or on bigger loops.

Yay ! We are now on to the fifth colour change ! Nearly there !
 As you can see from the picture I have nearly worked my way through all of the colour shades . For this rug I decided to work six round of each colour to try and give it an even and balanced appearance colour wise . I suggest when you first start you experiment with block colours, mixing colours together and designing your own patterns . You will find that fabric with elaborate or unpromising looking prints on it can make wonderful rugs..which means that that hideous old pair of curtains or bedding set you have hanging around can actually become something lovely again !

On to the final colour change at last ! This rug didn't take too long to make ..approximately two evenings work !
and finally it's finished !! Here is it pictured folded in half !

Traditionally people made these rugs using the snapped off handles of old style wooden toothbrushes ( which used to feature a hole similar to that on a sewing needle) hence the name of the technique . Nowadays you can buy a simple plastic or wooden tool on eBay such as the one here (which is the one I use), at craft stores or on Etsy to use to make these rugs . Alternatively many people fashion their own "making " tool and this can be an especially good option when you are first trying out the technique to see if it is a craft you would like to take up .. this way there is minimal expense involved if you find it isn't for you . When I first tried it out I used the snapped off handle of a house decorating paint brush !
To make a toothbrush rug you will need;
Fabric strips of your choice - cotton or light weight fabrics are easiest when you are starting out
An appropriate tool to work the fabric ( see above)
A flat surface to work on ( table/floor or piece of board)
A safety pin
Scissors
Patience !
AND the following links !
So before you get started you will need to learn how to prepare fabric strips and then later how to join on new strips . I found various info on how to do this when I was first looking but the simplest technique for tearing ( yes tearing not cutting ) strips I found was demonstrated by Aunt Philly here ..who I gather is toothbrush making royalty stateside ! There is a little bit of product up - selling in this video as Aunt Philly does offer a booklet and DVD on her website which can be purchased in order to learn how to make these rugs, however it is perfectly possible to learn to make these rugs using all the links I will provide here ..those and a little determination and you will have a lovely handmade rug in no time ! But do feel free to pop over to her website and purchase a kit or DVD if this would better suit the way you learn . I have to admit i have always disregarded the advice she gives regarding ironing my strips of fabric ( unless they are very wrinkled to start with) and I have never had any problems .
So ..once you have gathered all of your equipment ..and torn some strips then you need to learn a technique to be able to attach strips of fabric to each other when you start off and as your rug grows The best video tutorials I found are made by a lovely lady over at a website called Rag Rug Cafe and these were the videos I used to teach myself . They are listed as three videos in a set order , however I found that following them in the order I have placed them in here is the most logical process. So this first video demonstrates how you attach and add on new strips of fabric .
So now you know how to tear fabric and attach strips to each other you are ready to start making your rug ! So the first steps of working your first two strips of fabric is demonstrated in this video tutorial and also in this second full video here..I suggest you watch both. These videos can also be found on the main Rag Rug Cafe Website.
I highly recommend this website as it has a forum where people share tips and pictures and is a very friendly place to post questions when starting out . The website also has a friendly Facebook group which can be found here.
I found the working the first two strips very easy when I first started making these rugs but the initial stage where you begin to work the lengths into a round very tricky and I had to replay and replay that stage of the video as for some reason I couldn't take it in !
However, with a bit of persistence I got the knack of doing it ..and once you get it it's very simple and you wonder what the problem was in the first place ! Once you start working your round you just keep on going ( adding in strips as shown in the Aunt Philly video) as you run short . Keep going until you are happy with the size of your rug and when you are ready to finish then use the technique shown here .
There is also a further video on oval versus circular rugs which can be seen here
I hope this guide helps you find all the info you need to start successfully making your own toothbrush rugs and that you have fun making them ! I will try to answer any questions you may have on the comments section .
In the meanwhile here is a rug that I made recently that shows the stages of making .
 |
| Fabric all ready for tearing into strips |
This picture shows the first two rounds colour ..as you will discover when you try out this technique it is the first couple of rounds that can be the most fiddly ! But once you get going it gets much easier !


Yay ! We are now on to the fifth colour change ! Nearly there !


On to the final colour change at last ! This rug didn't take too long to make ..approximately two evenings work !

No comments:
Post a Comment